
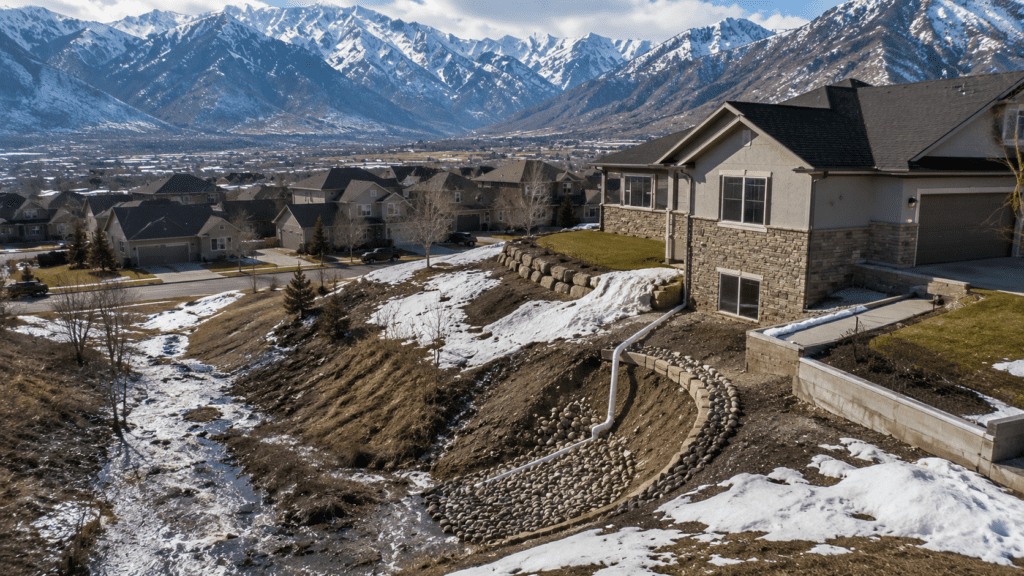
Utah’s spring snowmelt is predictable. Every March and April, the Wasatch and Uinta ranges shed millions of gallons of runoff. What’s less predictable is how much of that water ends up in your basement.
For the past two decades, I have specialized in waterproofing foundations throughout northern Utah, covering areas from Sandy to Ogden to Park City. Each spring, I consistently receive inquiries: “Water is coming through my basement wall. It started a week ago. What should I do?”
The answer isn’t simple because spring snowmelt basement water issues aren’t one problem—they’re five problems that usually happen together. A homeowner ignores a small seep, assumes it’s seasonal, doesn’t address the underlying foundation crack, and by next spring, they’re facing a wall with visible mold and thirty years of deferred foundation work.
This guide will help you understand what’s actually happening beneath your home, clarify why you’re seeing water this spring, and highlight which solutions truly work—not just for this season, but for the next twenty. Let’s begin by breaking down why Utah basements flood every spring, starting with the science behind snowmelt water.
Why Utah Basements Flood in Spring: The Science Behind Snowmelt Water
Utah’s climate creates a perfect storm for basement water problems.
We get 20–40 inches of snow annually across the Wasatch Front. That snow lingers until April, then 60% melts in 4–6 weeks.
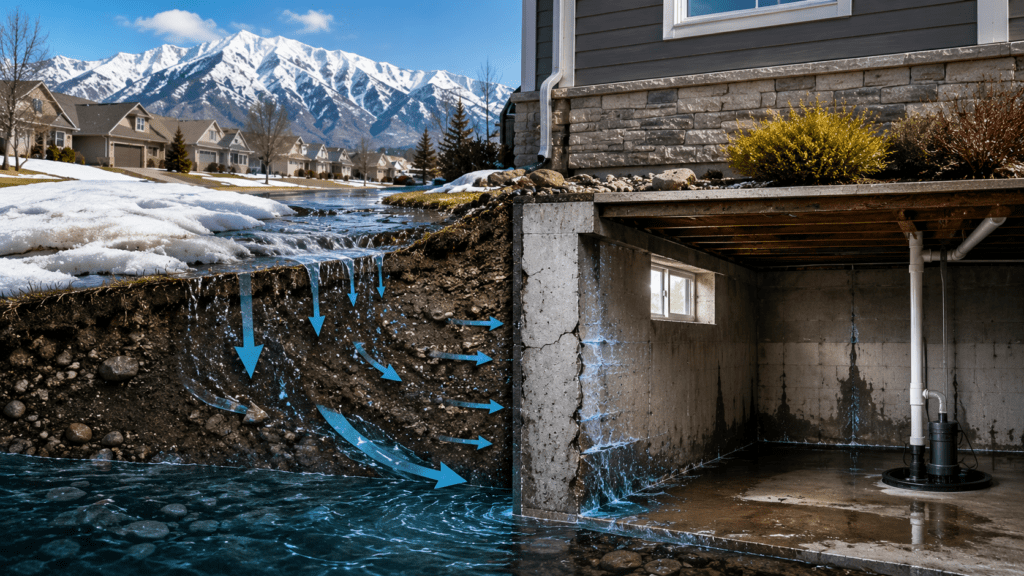
Here’s what happens at your foundation during peak snowmelt:
During warm spring days, snowmelt runs toward your foundation. Utah’s poorly drained soil becomes saturated quickly.
As soil saturates, water pressure against the basement walls spikes. Pressure can reach up to 600 pounds during snowmelt.
Most Utah homes built before 1990 have some foundation cracks. Utah’s clay soils move when wet or dry, letting spring snowmelt push through these cracks.
Drainage Failure Phase: If your home was built without proper foundation drainage—or if that drainage system has failed (which it typically has after 20–40 years)—water has nowhere to go except toward your basement.
The result: water seeping through walls, pooling at corners, finding its way through floor-wall joints, and, often, visible water in finished basement spaces.
This persistent challenge is more than a seasonal headache—snowmelt triggers it in March and April, but the root foundation issues often persist year-round. Now, let’s explore the specific water problems Utah homeowners face each spring.
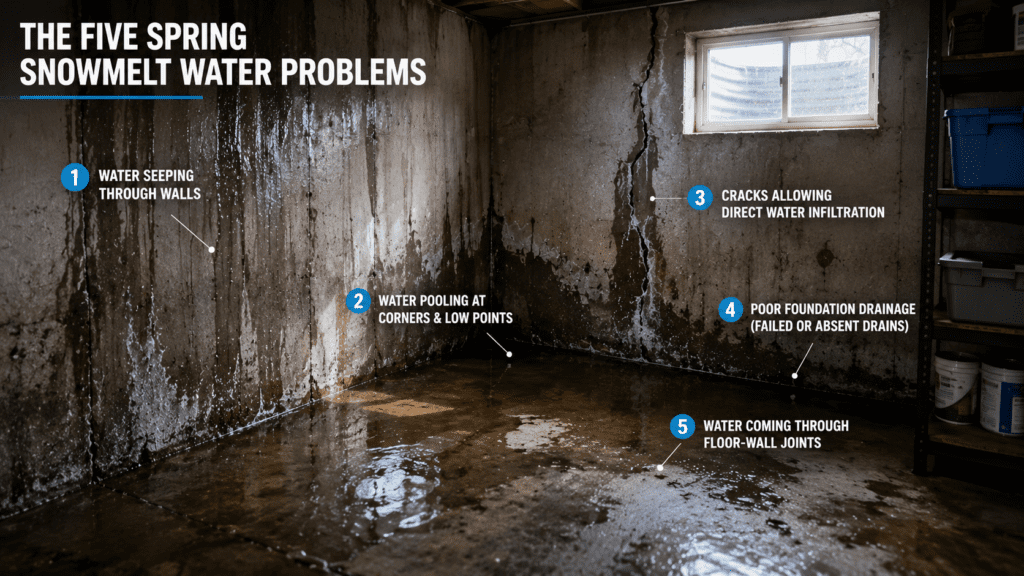
The Five Spring Snowmelt Water Problems Utah Homeowners Face
Most homeowners assume there’s a single culprit: water in the basement. In reality, five distinct problems often appear together. Here’s what to look for as we break down each one.
Problem #1: Water Seeping Through Foundation Walls
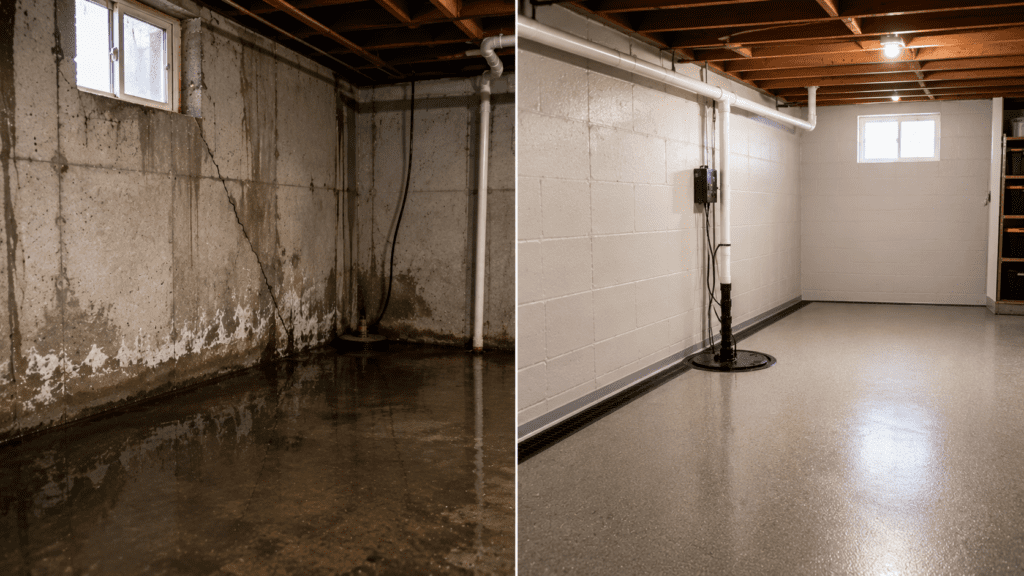
This is the most visible sign. You’ll notice moisture on basement walls—usually starting in corners or along the floor-wall joint. The water appears as dark stains, efflorescence (white mineral deposits), or actual seepage.
Why it happens: Foundation cracks, whether structural or hairline, allow water under hydrostatic pressure to migrate through concrete. Even a crack 1/32 of an inch wide can leak under sufficient pressure. Poured concrete foundations commonly develop shrinkage cracks during curing; these are present in most homes and lie dormant until spring snowmelt exerts enough pressure to force water through.
Why homeowners ignore it: “It’s just seasonal. It’ll stop in May.” That’s partially true—the visible seepage will decrease once snowmelt ends. But the cracks remain, and next spring, the water returns.
Problem #2: Water Pooling at Foundation Corners and Low Points
Basement corners are gravity’s collection point. Water follows the path of least resistance, and corners are where that path terminates. You’ll see water pooling at inside corners, sometimes with a visible “tide line” on the wall above it.
Hydrostatic pressure peaks at the lowest points of your foundation. Corners focus this pressure. Failed or missing drains cause water to settle at corners.
Why homeowners ignore it: The water pools but doesn’t spread. A homeowner might use a wet-dry vacuum or a sump pump to clear it, assuming that’s the solution. The underlying problem—failed perimeter drainage or saturated soil—remains untouched.
Problem #3: Cracks Allowing Direct Water Infiltration
Utah experiences significant seasonal soil movement. Clay-based soils swell when wet and shrink when dry. This movement creates and widens foundation cracks. During snowmelt, when soil is at maximum saturation, those cracks are at maximum width and depth.
You might see water flowing directly into the basement through a visible crack, often in a fine spray or mist pattern as water is forced through under pressure.
Why it happens: Structural settlement, seasonal soil movement, concrete shrinkage during curing, or hydrostatic pressure widens existing hairline cracks. Utah’s bentonite clay soils are particularly prone to movement; homes in areas with high clay content see more cracking than homes built on sandy or rocky soils.
Why homeowners ignore it: A homeowner spots the crack, thinks about calling a contractor, then the water stops in May, and they forget about it. They don’t realize that the crack will widen further over the next 5–10 years, and next spring’s snowmelt will be worse.
Problem #4: Poor Foundation Drainage (Failed or Absent Perimeter Drains)
The most common cause of spring snowmelt basement water isn’t the cracks—it’s the missing or failed drainage system.
During foundation construction, a perimeter drain (also called a footing drain or French drain) should be installed around the entire foundation perimeter at the base of the footing. This drain collects groundwater and directs it away from the foundation, either to daylight (a slope), a sump pump system, or a storm drain.
Older Utah homes often lack working perimeter drains due to improper installation, age, or clogging.
Why it happens: Saturation develops because water has nowhere to go. Without a functioning perimeter drain, hydrostatic pressure builds against the foundation wall. The soil becomes a water reservoir, and your basement wall becomes the dam.
Why homeowners ignore it: Perimeter drains are completely invisible. A homeowner doesn’t know their drain has failed until water appears. They see water and assume it’s a crack problem when it’s actually a drainage problem.
Problem #5: Gutters and Downspouts Discharging Near the Foundation
This one kills me. I visit homes where the gutter downspout empties four feet from the foundation, directly above soil already saturated by snowmelt. The homeowner has “fixed” the water problem with gutters, but they’ve created the problem in the first place.
Gutters help only if they move water away from the foundation. A home can shed up to 1,000 gallons of water from snowmelt each day. If discharged near the foundation, all that water adds to pressure.
Why it happens: Improper downspout installation. The downspout should extend 6–10 feet from the foundation or drain into an underground system that directs water to daylight or a storm drain. Many homes have downspouts that end 2–3 feet from the foundation, or no downspout extension at all.
Gutters are highly visible and can seem like a complete—and final—solution. Many homeowners install gutters and, seeing them perform well during rain, assume the water issue is solved. However, if water continues seeping in during spring snowmelt, it’s time to reconsider whether gutter placement plays a hidden role.
How to Diagnose Your Spring Snowmelt Water Problem
Before you can solve the problem, you need to understand which of these five issues you’re facing—because the solution differs for each.
Visual Inspection Checklist
Walk your basement during or after spring snowmelt and look for:
Wall seepage patterns:
- Where is water entering? Top of the wall, middle, or floor-wall junction?
- Is it coming through cracks or through porous concrete?
- Are the stains in corners, or distributed across wall sections?
Corner and low-point pooling:
- Where does water collect?
- How much depth before you notice it?
- Does it appear within hours of heavy snowmelt, or does it build over days?
Foundation cracks:
- Can you see visible cracks?
- Are they hairline or wide (1/8 inch or more)?
- Are they horizontal, diagonal, or vertical?
- Do you see water flowing through them?
Gutter and downspout condition:
- Do you have gutters? Are they clean?
- Where do downspouts discharge?
- Are there splash blocks or extensions?
- Do gutters overflow during snowmelt?
Soil around the foundation:
- Is the soil compacted or settled?
- Are there visible erosion areas?
- Is the ground graded toward or away from the house?
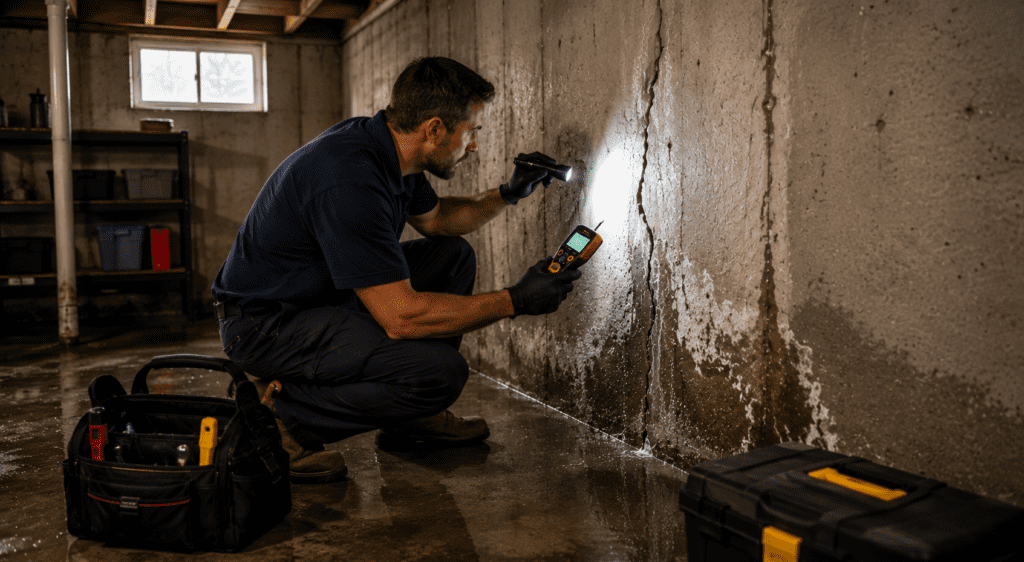
Professional Diagnosis Tools
If you want a complete picture before investing in solutions, a professional inspection should include:
Moisture meter testing: Shows where moisture is highest in the concrete and walls—indicates primary water entry points.
Foundation crack assessment: Determines whether cracks are structural (dangerous) or cosmetic (cosmetic, but potentially problematic during water events).
Perimeter drain inspection: Video inspection of existing drains reveals whether they’re functioning or clogged. Many contractors use a sump pump test to determine drain functionality.
Soil percolation testing: Determines how quickly water drains through your soil. Poor percolation means water lingers around your foundation.
Hydrostatic pressure assessment: During heavy saturation, a professional can determine the actual hydrostatic pressure your basement wall is experiencing—this dictates which solutions are appropriate.
The Five Common Mistakes Homeowners Make (And Why They Cost More Later)
Before we discuss solutions, understand the mistakes that turn a $5,000 foundation problem into a $25,000 problem.
Mistake #1: “It’s Just Seasonal—It’ll Go Away”
The water does go away once snowmelt ends. The problem doesn’t.
A foundation crack doesn’t heal itself. Saturated soil around your foundation dries out, but the structural issues remain. You’re delaying the inevitable while the foundation experiences repeated hydrostatic stress.
Each spring, the crack widens slightly. Mold grows in damp basement spaces. Water damage accumulates in stored items or finished walls. By the time you address the problem 5–10 years later, you’re dealing with structural damage, mold remediation, and far more expensive waterproofing work.
The cost of delay: Waiting costs you $15,000–$30,000 in additional repairs—exterior excavation, mold remediation, structural repairs—that could have been prevented with a $5,000–$10,000 solution today.
Mistake #2: “Interior Sealers and Coatings Are a Permanent Fix”
This is the most dangerous misconception.
Interior sealers and epoxy wall coatings make your basement look dry. They hide the water problem. But they don’t stop the water.
Hydrostatic pressure is still there. The crack is still there. The water is still pushing through—it’s just behind the coating now. Over 2–5 years, the coating delaminates, cracks, and fails. Water finds its way through.
Worse, that trapped moisture behind the coating creates an ideal environment for mold growth and structural rot. You’ve created a hidden problem that becomes visible only after significant damage.
Interior sealers have a place—they’re useful for cosmetic sealing of non-structural cracks where water has already been addressed by other means. But they’re never a primary solution to a hydrostatic pressure problem.
The cost of this mistake: You spend $2,000–$3,000 on sealers that fail in 3–5 years, then spend $15,000–$25,000 on actual waterproofing that should have been done in the first place.
Mistake #3: “Gutters and Downspouts Solve Everything”
Gutters are essential—but only if the water goes somewhere other than your foundation.
A homeowner installs new gutters and downspouts that empty 3–4 feet from the foundation, directly above the perimeter drain area. They’ve spent $2,000 and made the problem worse.
Gutters are 20% of the solution. The other 80% is proper grading, perimeter drainage, foundation crack repair, and downspout placement 6–10 feet from the house or directed to an underground drainage system.
The trap: Gutters feel like a complete solution because they’re visible and make sense. You can see them working. But you can’t see hydrostatic pressure, and you can’t see a failed perimeter drain. Homeowners solve the visible problem and ignore the invisible one.
Mistake #4: “Minor Seeping Isn’t Worth Fixing Now”
“It’s only a little water. I can live with it.”
Minor seeping today is a water intrusion highway tomorrow. That small crack will grow. That minor seepage will spread as the crack widens. Utah’s soil movement ensures that cracks continue to widen over 5–10 years.
Additionally, ongoing moisture in basement spaces accelerates mold growth, deteriorates stored items, damages insulation, and eventually damages structural elements like rim joists and band boards.
You’re not choosing between “minor seeping” and “no seeping.” You’re choosing between addressing it now for $5,000–$8,000 or addressing it later for $20,000–$40,000 when structural damage and mold remediation are involved.
Mistake #5: “This Foundation Crack Means My House Is Failing”
Not all cracks are structural failures.
Many Utah homes have cosmetic cracks—hairline fractures in concrete that don’t indicate structural instability but do provide a pathway for water. These cracks can be addressed with epoxy injection and don’t indicate that your foundation is compromised.
Structural cracks are wider (typically 1/8 inch or more), show diagonal patterns, and often involve wall bowing or floor settling. These do require professional assessment.
The mistake homeowners make: they see any crack and panic, or they see a small crack and assume it’s not a problem. The reality is nuanced—a professional can distinguish between cosmetic and structural in minutes.
The fear trap: Panic leads homeowners to either overreact (spending money on unnecessary structural repairs) or underreact (ignoring a water problem because they convince themselves the crack is just cosmetic).
The Solutions: Which Waterproofing Methods Actually Work in Utah
Now that you understand the problem, here’s what actually solves it. Different issues require different approaches—most homes need a combination of solutions.
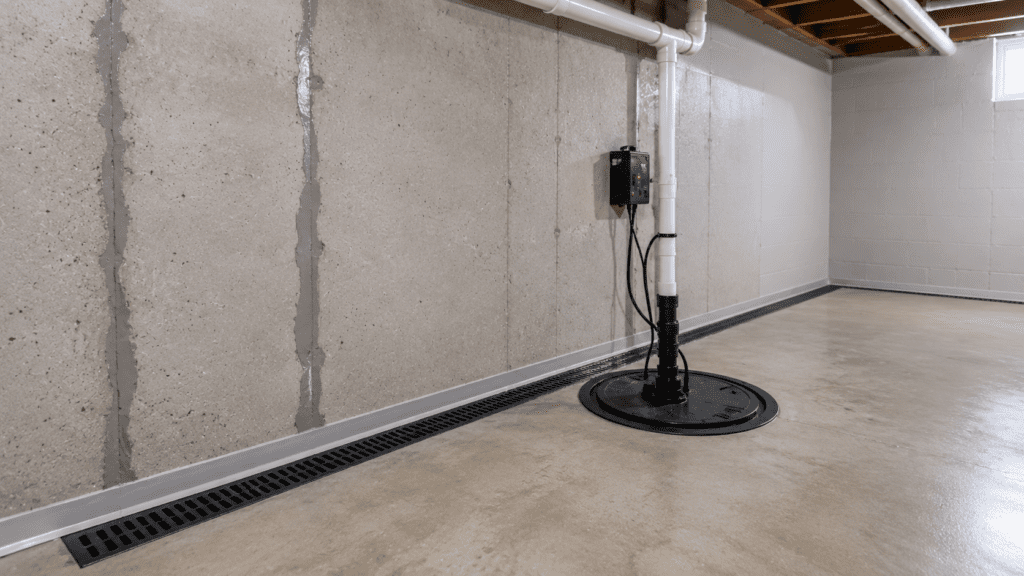
Solution #1: Interior Perimeter Drainage (French Drain Systems)
What it is: An interior drainage system installed around the basement perimeter, typically at floor level. Water seeping through foundation walls or from below-floor areas is captured and directed to a sump pump basin, where it’s pumped out of the house.
How it works:
- A trench is cut around the basement perimeter (6–12 inches deep, 6–12 inches wide)
- Perforated drain tile is installed in the trench.
- The drain tile connects to a collection basin or sump pump pit.
- Water that seeps through the foundation is captured and pumped out (or drained to daylight if slope permits)
Why it works in Utah: Interior drainage systems work independently of exterior conditions. If your perimeter drain failed or was never installed, water still gets managed. During snowmelt saturation, water is captured and removed before it causes damage.
When to use it:
- Failed or missing exterior perimeter drain
- Saturated soil that won’t dry out
- Basement finishing (epoxy flooring, carpet), where water infiltration must be prevented.
- Basement use as living space (bedrooms, offices)
- Clay-based soils with poor drainage
Cost: $4,000–$10,000 depending on basement size, complexity, and whether a sump pump system is required.
Advantages:
- Works in any soil condition
- Doesn’t require exterior excavation
- The basement stays usable during installation.
- It can be added even to older homes where exterior drains were never installed.
- Sump pumps are reliable and maintenance-free.
Disadvantages:
- Sump pump requires power (install a backup battery or generator)
- Pump maintenance required (quarterly checks)
- Doesn’t address the root cause if the root cause is exterior drainage—it manages symptoms.
- Trenching can disturb finished basement spaces.
Maintenance: Quarterly inspection of pump operation, annual pump servicing, and occasional basin cleaning of sediment.
Solution #2: Exterior Foundation Excavation & Waterproofing
What it is: Excavating around the foundation perimeter to expose the exterior foundation wall, installing exterior waterproofing membranes, repairing cracks, and installing (or repairing) the perimeter drain system.
How it works:
- The soil is excavated down to the footing (typically 4–6 feet deep)
- The exterior foundation wall is cleaned and inspected.
- Foundation cracks are sealed with epoxy or polyurethane injection.
- An exterior waterproofing membrane is applied to the entire foundation surface (typically bentonite, polymer, or rubberized asphalt)
- A new perimeter drain system is installed at the footing.
- Soil is backfilled
- Grading is corrected to slope away from the foundation.
Why it works in Utah: This addresses the root cause. It prevents water from ever reaching the foundation in the first place. Once completed correctly, exterior waterproofing eliminates hydrostatic pressure issues for 30–50 years.
When to use it:
- Severe water problems with structural cracks
- Planned basement finishing or remodeling
- Perimeter drain replacement (it’s being done anyway)
- Homes with persistent water issues despite interior solutions
- Homes where you want a permanent solution, not a managed problem
Cost: $12,000–$35,000+ depending on excavation scope, foundation size, crack severity, and soil conditions. Costs are highest in urban areas where excavation space is limited and where utility line avoidance is complex.
Advantages:
- Permanent solution (when done correctly)
- Eliminates hydrostatic pressure at the source
- Addresses foundation cracks while you’re excavating
- Allows inspection of footing condition
- No ongoing pump maintenance
- Doesn’t use the basement space
Disadvantages:
- High upfront cost
- Requires excavation (landscaping disruption, potential utility conflicts)
- Soil weather-dependent (must complete before winter, difficult during heavy rain)
- Timeline is longer (typically 2–3 weeks)
- If the soil is poor, you may need shoring or special excavation equipment (increases cost)
Best practice: Many contractors (including myself) recommend exterior waterproofing during spring—after spring snowmelt but before summer rain—so you can work in drier soil conditions.
Solution #3: Epoxy Crack Injection
What it is: A targeted solution for foundation cracks. Epoxy or polyurethane is injected into cracks under pressure, filling them entirely and restoring the concrete’s structural integrity.
How it works:
- Injection ports are drilled along the crack at 12-inch intervals.
- The crack is cleaned (sometimes with high-pressure water)
- Epoxy or polyurethane is injected under pressure through each port.
- Injection ports are sealed.
- The crack is visually sealed from the inside with epoxy or polyurethane caulk.
Why it works in Utah: Foundation cracks in Utah are common due to concrete shrinkage during curing and seasonal soil movement. Epoxy injection addresses the crack itself, preventing water from flowing through it and, when done correctly, restoring structural continuity.
When to use it:
- Hairline to moderate cracks (up to 1/4 inch)
- Cracks without active structural movement (a professional assessment determines this)
- Budget-conscious homeowners who want to address visible water entry points
- Cosmetic cracks that happen to be water entry points
- Combination approaches (epoxy injection + interior drainage)
Cost: $300–$1,500 per linear foot for the crack, depending on length and severity. A typical basement crack (20–30 feet) costs $1,500–$3,000.
Advantages:
- Targeted, cost-effective solution
- Addresses visible water entry points
- Restores crack to original concrete strength.
- Can be applied to multiple cracks
- No basement disruption
- No exterior excavation required
Disadvantages:
- Doesn’t address hydrostatic pressure (water just finds another path)
- Doesn’t address failed perimeter drains
- Can fail if applied to cracks with active movement
- Requires professional assessment to distinguish cosmetic from structural cracks
- Not a permanent solution if the underlying soil movement continues
Common mistake: Homeowners inject a crack, water stops flowing through that crack, and they assume the problem is solved. Three months later, water appears 10 feet away—it’s found another path through a different crack or the basement floor-wall joint. Epoxy injection works best as part of a larger solution.
Solution #4: Sump Pump Systems
What it is: A pump installed in a basin either below the basement floor (submersible) or beside the foundation (pedestal). The pump automatically activates when water rises above a set level, pumping water out of the basement through a discharge line.
How it works:
- A sump pit is installed (either as part of an interior drain system or as a standalone solution)
- A submersible or pedestal pump is installed in the pit.
- A check valve is installed in the discharge line (prevents water from flowing back into the basement)
- A discharge line extends outside, 6–10 feet from the foundation (or to a storm drain)
- The pump activates automatically via a float switch when the water level rises.
Why it works in Utah: Spring snowmelt creates massive temporary water volumes. A sump pump moves water out of the basement faster than it can seep in—as long as power is available.
When to use it:
- In combination with interior drainage systems
- As a standalone solution in basements with minor water issues
- Basements that are finished (you need them as backup to other solutions)
- Any basement that’s actively used as a living space
Cost: $800–$3,000 installed (pump plus installation). Add $200–$500 for backup power solutions.
Advantages:
- Automatic operation (no manual intervention)
- Affordable
- Can handle high water volumes
- Reliable technology
- Easy to service
Disadvantages:
- Requires electricity (install backup power—critical in Utah, where spring storms cause outages)
- Pump failure can be catastrophic if not monitored.
- Maintenance required (quarterly checks, annual servicing)
- Doesn’t prevent water from entering—just removes it after entry.
- The discharge line can freeze in winter (a problem in northern Utah)
Critical addition: Always install backup power—either a battery backup system or a generator hookup. A power outage during spring snowmelt is exactly when your sump pump fails, and backup power prevents catastrophe.
Solution #5: Combination Approaches (The Most Effective)
Most Utah homes with serious spring snowmelt water issues benefit from a combination approach:
For homes with multiple problem areas:
- Interior drainage system (captures water already in the soil)
- Epoxy crack injection (seals primary water entry cracks)
- Sump pump system (removes water that enters)
- Gutter and downspout extension (prevents water from reaching soil in the first place)
For homes with severe or persistent problems:
- Exterior excavation and waterproofing (permanent solution)
- Perimeter drain installation/replacement (prevents water from ever reaching the foundation)
- Interior drainage as backup (safety net in case exterior solution is compromised)
For homes where cost is a primary factor:
- An interior drainage system ($5,000–$8,000) solves the immediate problem.
- Plan for exterior waterproofing in 3–5 years as a permanent upgrade
The combination approach distributes water management across multiple systems—water is prevented from reaching the foundation, and if it does, it’s captured and removed before it can damage anything.
Utah-Specific Considerations: Why Your Location Matters
Spring snowmelt water problems aren’t the same across Utah. Your location affects both the severity of the problem and the approach to the solution.
Wasatch Front (Salt Lake, Davis, Utah Counties)
- The problem: Heavy spring snowmelt from the Wasatch Range. Bentonite-heavy soils with poor drainage. Older homes (pre-1980) rarely have perimeter drains. Urban lot density means limited excavation space.
- The solution: Interior drainage systems are most practical. Exterior excavation is limited by space constraints. Plan for sump pump backup during peak snowmelt.
- Regional challenge: The Wasatch Front has intense spring snowmelt in a short time window (March–April). Saturation can be severe.
Cache Valley (Logan, Smithfield, North Ogden)
- The problem: Even heavier snowfall (40–60 inches). Short, intense snowmelt window. Higher water table in some areas.
- The solution: Combination approaches with robust sump pump backup. Some homes may benefit from exterior waterproofing more than Wasatch Front homes due to higher soil saturation.
- Regional challenge: Flooding risk is higher. Saturation is more severe and longer-lasting.
High Mountain Communities (Park City, Alta, Snowbird, Brian Head)
- The problem: Extreme snowfall (200–400 inches). Very intense, concentrated snowmelt (April–June). High water table. Poor soil drainage at elevation.
- The solution: Exterior waterproofing is most effective. Interior systems alone often cannot keep up with melt rates. Backup sump pump systems with a generator backup are critical.
- Regional challenge: Snow lasts longer, melt is more intense and prolonged. A single snowmelt season can cause severe problems.
Southern Utah (St. George, Hurricane, Ivins)
- The problem: Less frequent but more intense snowmelt events. Some years are dry; others have significant spring water issues.
- The solution: Interior drainage systems are effective because saturation periods are shorter. Gutter and downspout management is critical.
- Regional challenge: Variability makes homeowners more likely to delay solutions (“We didn’t have a problem this year”).
Step-by-Step: What to Do Right Now
If you’re experiencing spring snowmelt water problems, here’s your action plan:
This Week: Emergency Response
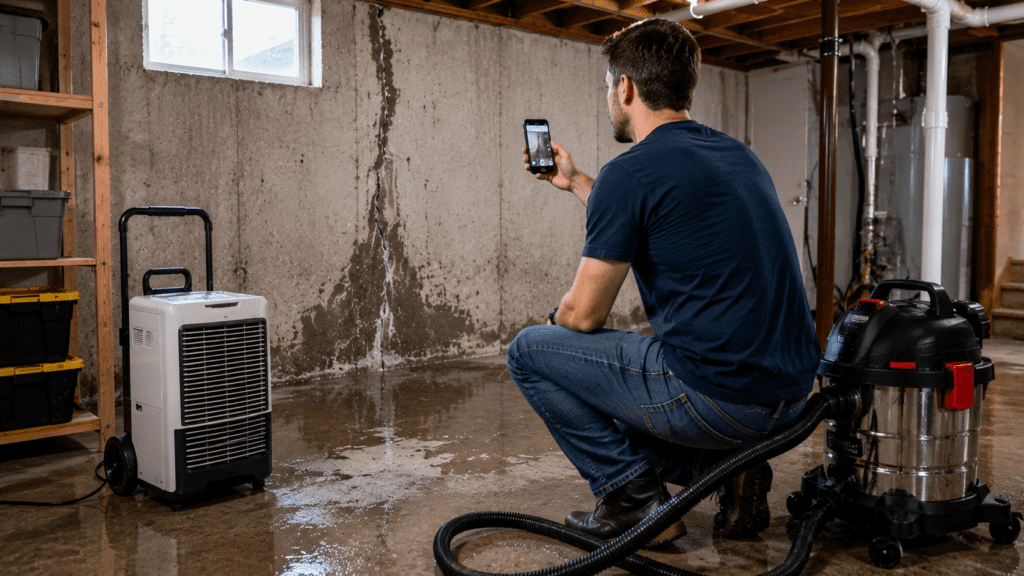
- Stop the water from spreading: Use wet-dry vacuums or dehumidifiers to remove standing water. This prevents mold growth during diagnosis.
- Document everything: Take photos and video of water entry points, pooling areas, stains, and cracks. Note dates and times water appears. This documentation is critical for professional assessment and insurance claims.
- Move sensitive items: Store documents, photos, electronics, and furniture away from wet areas. Water damage to stored items accelerates as saturation continues.
- Check gutters and downspouts: Clean gutters and ensure downspouts extend 6–10 feet from the foundation or drain into underground systems. This single step solves 10–15% of spring snowmelt problems.
Next 2 Weeks: Professional Assessment
- Schedule a foundation inspection: A professional assessment determines which of the five problems you’re facing and which solutions apply. Expect to spend $300–$500 for a thorough inspection and written assessment.
- Ask specific questions:
- Which water entry points are primary vs. secondary?
- Do you have a perimeter drain, and is it functioning?
- Are foundation cracks cosmetic or structural?
- What soil conditions are you dealing with?
- What’s the recommended solution, and why?
- Get written recommendations and cost estimates; never rely on verbal assessments. A professional should provide written findings and cost estimates for each recommended solution.
Next 4 Weeks: Planning and Implementation
- If water is actively entering: Implement an interior drainage system as an immediate solution ($5,000–$8,000). This solves the problem while you plan permanent solutions.
- If water is minor seepage: Epoxy crack injection plus a sump pump system ($2,000–$4,000 total) gives you time to plan exterior waterproofing.
- If you’re planning basement finishing, implement a complete solution now (interior drainage, epoxy cracks, proper grading) rather than discovering problems mid-renovation.
Long-Term: Permanent Solution
-
- Schedule exterior waterproofing: Plan for spring of the following year (when soil is driest). Budget $15,000–$30,000 depending on home size and condition.
- Replace failed perimeter drains: If your home has a failed exterior drain, replacement during exterior excavation is the right time to do it.
The Long-Term View: Spring Snowmelt Is Recurring, Not Annual
Here’s the insight that separates homeowners who solve this problem from homeowners who battle it for decades:
Spring snowmelt is not an annual crisis—it’s a recurring structural reality.
Every spring, your foundation will experience hydrostatic pressure. Every spring, water tests the integrity of your foundation. Your goal is to have a system in place that handles that pressure and removes that water before it causes damage.
A short-term sealant approach costs you more over 30 years than a proper permanent solution costs you today. Every spring you delay the permanent fix, you’re accumulating hidden water damage.
The homeowners I work with who regret delaying foundation work aren’t the ones who invested $25,000 in exterior waterproofing five years after buying their home. They’re the ones who spent $3,000 on sealers, $2,000 on interior sump pumps, $4,000 on mold remediation, and $15,000 on exterior excavation—all because they delayed the permanent solution by a decade.
Get assessed. Address it now. Choose the permanent solution over the temporary one. Your future self will thank you.
Conclusion
Spring snowmelt basement water isn’t a mystery. It’s a predictable result of Utah’s climate colliding with foundation realities: cracks, failed drainage, hydrostatic pressure, and saturation.
Understanding which of the five problems you’re facing—water seeping through walls, water pooling at corners, foundation cracks, poor drainage, or gutter failures—determines which solution works.
Interior drainage systems ($5,000–$8,000) solve immediate problems and work for most Utah homeowners. Exterior waterproofing ($15,000–$35,000) provides a permanent solution for severe or persistent issues. Epoxy crack injection ($1,500–$3,000) addresses specific water entry points. Sump pumps manage water after it enters. The most effective approach combines multiple solutions.
The biggest mistake homeowners make is confusing temporary water removal with permanent water prevention. Sealers hide the problem. Interior systems manage it. Only exterior waterproofing and perimeter drainage solve it.
Don’t spend the next ten springs dealing with water in your basement. Spend one spring addressing it properly, and then don’t think about it again.